Thursday, March 15, 2012

Project 366: Week 10


64 | 366 basement cleaning
March 4, 2012 - our basement has never really 'recovered' from our move at the end of 2011.  My wonderful husband built me some wooden shelves to complement the metal ones so I made it my task for today to tackle this mess....and I did make A LOT of progress!


65 | 366 cookie time
March 5, 2012  I love this time of the year -- so bad for the diet...but so delicious...


66 | 366 spring
March 6, 2012 - wonderful high temps gave us a tease of Spring today.  We spent lots of time playing outside in the yard getting muddy.


67 | 366 bath time
March 7, 2012  - bath night for the boys.  Sam spent most of the bath pouring water over his own head -- he loves that more than anything!


68 | 366 dessert time
March 8, 2012 One good deed deserves another - a good workout ends with a treat of chocolate ice cream and raspberries.  :)


69 | 366 milkshake mustache
March 9, 2012 - our after dinner milkshakes (aka smoothies) left mustaches on some novice drinkers.


70 | 366 day at the park
March 10, 2012 - the weather is finally nice enough that we can go to the park!

Sunday, March 11, 2012

Basement Clean Up

I know some of you have been asking to see photos of the new shelves the hubby built in the basement, so I tried to document some of the clean-up that happened down there.... Looking back at the photos, I hope you can even tell the difference! It's hard for me to see it, but maybe that's just because I've been looking at it for so long.

Anyways, the goal eventually is to finish off the basement, but for now it is serving as a storage area for all the runoff stuff that we don't want in our living space as well as a workout area (we keep the treadmill down here).  There is a LOT of empty usable space down here, so someday I imagine this will become the 'man-cave'.  LOL.

So, realistically, it really has only been 6 months since we moved into our new house, but the basement just became a dumping ground for anything we didn't know where to put or something we just didn't want to deal with. 

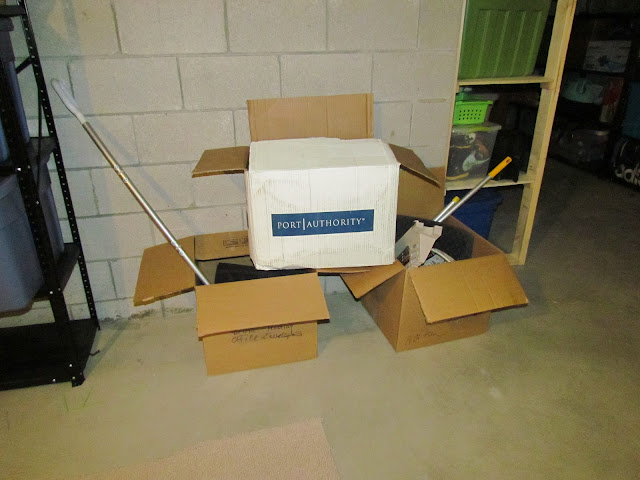
And before long, this is what it was starting to look like:


Pretty, eh?  Not so much.  (and I have to note that this is picture is in an in-between stage of clean up...originally, the entire wall behind the pile of boxes was covered with those black metal shelves...which was FINE, but we had run out of room on them, and it was hard to fit some of the Rubbermaid bins that I prefer to store things in on them...)

So, when the hubby offered to build some custom shelves in the basement...ones that my bins would actually FIT onto, I stammered something about how awesome he was and and shrieked "YES!"

My manly man spent ONE Saturday and hammered out those shelves.  I mean, seriously, he went down there, measured the wall, measured the bins, went to the store and started in on his plan.  He even let the mini me help him a little bit.  By the end of that day, my shelves were finished!

And so, out of appreciation of all his hard work, I knew my job was just beginning -- the job to sort through all of our stuff and put it on the new shelves.  Procrastinate, no more!

And so, I went from the above picture, to THIS:


The boxes around the perimeter of the room have since been removed (they were filled with trash and donation materials)...

Here's another BEFORE view of the room -- this is what you see right when you come down the steps and turn into the room:


And that now looks like THIS:


I left a few of the black metal shelves along this wall to act as my mailing and wrapping station --  it's really nice to have all of those supplies in one place!

Here's another BEFORE view of that same area, just looking back towards the steps:


And the AFTER.  I am going to use this shelf as my pantry overstock.  Eventually, when we re-run the electric in the basement, the chest freezer will go to the left of this shelf.


And the rest of those black shelves I had mentioned before?  Well, they got re-located to this back area that is solely for storage.  They fit nicely against this wall, I think, and now they are out of plain view.


And the shelves my wonderful hubby built me?  Look at them!  Aren't they awesome?  I loved them so much I convinced him to build more in the garage!  And he did it!  :)


He's so awesome, and I am so incredibly lucky!  :)

Friday, March 9, 2012

Foodie Friday: Crockpot Chicken Tacos

I wish I had a photo of this deliciousness to share with you, but we ate this too fast to snap a shot of it, and my only other option would be to steal someone else's photo off the interwebs.  So, I am just going to share this delicious recipe with you without any visual aids and you're going to have to take my word on it.  Sorry.  It doesn't make the prettiest picture anyway, trust me.  :)

I originally pinned this recipe, and it was the inspiration for mine -- of course anyone that knows me knows that when I cook, I rarely follow recipes, and I always add my own little twists.  Makes life interesting!

Anyways, I whole heartedly recommend making this super EASY recipe -- and I even have a few tricks up my sleeve to make it even EASIER!

Crockpot Chicken Tacos
Time:  Prep = 5 mins; Cook time = 4-6 hrs on high; 6-8 hours on low

Ingredients: 
1 envelope enchilada sauce (okay, so the original recipe calls for taco seasoning, but I didn't have any!  And I was too lazy to make my own, so I just dumped this in...trust me, it was GREAT)
6 pieces Boneless, Skinless Chicken Breasts
1 jar Salsa (16 oz)

1/4 cup pepper jelly (optional -- I had some left over that my mom had given me, and this made the chicken a little bit sweeter, which I liked)

Dump everything into a crock pot and give it a little stir to blend the seasoning with the salsa. Cook on high for 4 to 6 hours or on low for 6 to 8 hours.


I shredded up my chicken a little bit with a fork halfway through cooking to make it even moister.

When done cooking the chicken should shred easily with a fork -- but I have a BETTER way.  You can thank me later.  Get out your hand mixer -- YES -- your hand mixer.  Stick it in your crockpot and turn it on low.  Your chicken will shred unbelievably easily and PERFECTLY. 

You're welcome.

We ate this deliciousness in soft shell tacos with a sprinkle of cheddar cheese, sour cream (or Greek yogurt is a great substitute), avocado, tomatoes, lettuce, etc.  You could even add a jalapeno or two if you need a little bit more spice in your life.  Mine is spicy enough, thank you.

This recipe gets 5 stars from the family, and will definitely be made again soon!  So easy and SO delicious!

Tuesday, March 6, 2012

40 bags in 40 days: Week 2

Time for our weekly check in!  How's the purging been going in your neck of the woods?  Good I hope...

The timing of this is great because it is almost like spring cleaning... Also, in our climate here, it is almost time to cycle out the winter clothes and bring out the spring/summer ones.  We're lucky here in WI -- we get two seperate wardrobes depending on the seasons!  I love pulling down the bins of clothing and swapping them out -- it is almost like getting "new" clothes! 

Anyways, I mention the swapping of clothing, because it was helpful to do a sweep of our closets before we do our seasonal swapping -- make room for the new!

This week I focused on the kids' closets and my husband took care of his (don't worry -- I won't forget mine).  We also tackled the basement (see more about that in a later post). 

Here are our 'treasures' and 'trash' for the week:


Two large boxes of trash from the basement.


Three large boxes of items for the Goodwill from the basement


Clothes from the boys' closets -- most of this will be rummaged and some donated to Goodwill (and yes, that is a lone vase in that pile that is going to Goodwill also).

Project 366: Week 9


57 | 366 sunday night relaxing
Feb 26, 2012 - movie night and relaxing with tea with my hubby


58 | 366 midday snack
Feb 27, 2012 - vanilla yogurt with blueberries


59 | 366 mason
Feb 28, 2012 Can I come in now? It's cold out here!


60 | 366 happy mail
Feb 29, 2012 I love getting treats in the mail, but LuSa treats are even better!


61 | 366 reading
March 1, 2012 - Sam 'reading' with the TAG Jr.


62 | 366 playing adventures
March 2, 2012 - family game night playing "adventures" on the xbox kinect. Humourous stuff.


63 | 366 winter wonderland
March 3, 2012 - we woke up to a winter wonderland full of snow and had a blast shoveling and playing in it for most of the morning

Friday, March 2, 2012

Foodie Friday: Sea Salt Caramels


Every year around the holidays, I try to make one new thing, just to 'test it out'.  This year, that big thing was candy making...more specifically, making sea salt caramels.

And, I have to say, I was INCREDIBLY nervous, intimidated, and ready for failure.  Seriously.  Candy making always seems so hard....so tricky....so professional.

So, I was pleasantly surprised when the caramels turned out not just good, but GREAT.  Like seriously GREAT.

Of course my husband would tell you that they only turned out because HE is the secret ingredient.  Shhh...don't tell him, but he might be right.  The one time I tried making them without him, they didn't turn out right.  (But let's not tell him he's right, okay?)


I just have to warn you -- these things are SUPER ADDICTING.  Like you need to hide them so you don't eat them in your sleep addicting.  Also, they taste REALLY good if you coat them in dark chocolate and sprinkle the sea salt on top of that.  Those are ALSO very addicting, FYI.

Sea Salt Caramels (original recipe here):

TIME REQUIRED : Requires a few hours of cooling in addition to cooking and prepping
COOK TIME: 20 minutes
YIELD: 16 to 20 Caramels - but this varies on how you prefer to cut them


INGREDIENTS:
Vegetable oil or Cooking Spray
1 cup sugar
1/4 cup water
1/4 cup light corn syrup
1 cup heavy cream
4 tablespoons unsalted butter
1 teaspoon sea salt, plus extra for sprinkling
1/2 teaspoon vanilla extract


DIRECTIONS:

1. Line an 8-inch square baking pan with parchment paper. Lightly brush the paper with the vegetable oil or spray with the cooking spray.  (Note - one recipe I used aluminum foil only after I realized I was out of parchment paper and they turned out just fine)

2. In a small pot, bring the cream, butter, and one teaspoon of the sea salt to a simmer, over medium heat. Do not let it boil. Once it has reached a simmer, turn off the heat, and set it aside.

3. In a deep saucepan, combine the water, corn syrup, and sugar. Over medium-high heat, stir only until the sugar has dissolved. Then allow the mixture to boil, without stirring, until the mixture is a warm, golden brown. Watch very carefully, as the caramel can burn quickly toward the end. (It can be helpful to use a wooden spoon and drip some of the caramel onto a white plate to gauge the exact color...or if you have a husband like mine, trust his judgement).

4. When the sugar mixture is done, remove it from the heat and slowly add the cream mixture to the sugar mixture. Be careful because it will bubble up violently. Stir in the vanilla.

5. Return the mixture to the heat and cook over medium heat until a candy thermometer reads 248 degrees (firm ball), about 10 minutes (If you don't have a candy thermometer, don't despair...you can buy one at your grocery store for around $5). Immediately pour the caramel into the prepared pan. (Don’t scrape the pot into the pan...but go ahead and scrape it onto a scrap piece of parchment paper and enjoy it early!  You can thank me later.). Refrigerate pan for a few hours, until firm.

6. Remove the caramel from the refrigerator and allow it to come close to room temperature. Pry the caramel from the pan. On a cutting board, cut the caramel into bite sized pieces. (Note the original recipe had you cut it in half and then roll each half into logs and cut those up.  I found this step unnecessary.  Also, if you just go ahead and cut into bite sized chunks, these are easier to dip in the melted chocolate if you choose this extra step).

7.   Store in the refrigerator or in an air-tight container (preferably out of sight because you WILL eat these mindlessly....trust me!)

Sam sings his ABCs

Isn't he just adorable?  He's trying SO hard to sing along.  I LOVE HIM!


Thursday, March 1, 2012

Project 366: Week 8


50 | 366 pancake sunday
Feb 19, 2012 - the tradition continues at home -- chocolate chip pancakes. YUM.

51 | 366 sick day

Feb 20, 2012 - Sam had to stay home sick again because of the pukies. He immediately started asking for food, however. I talked him into thinking Rice Chex was a good snack. I swear this boy always seems to stay in a good mood....

52 | 366 pizza pizza

Feb 21, 2012 - Max got to make his own pizza for dinner tonight and had a fun time doing it. Papa Murphy's sells the kit called 'Mini Murphy' for only $3 for kids to make their own pizzas -- pretty smart!


53 | 366 computer time

Feb 22, 2012 - a quiet moment for the boys that I discovered this evening in the playroom. Sam likes to push the buttons which Max gets frustrated over; but for this moment they were enjoying each other's company...


54 | 366 coconut lentil stew

Feb 23, 2012 - I was craving coconut and lentils something fierce and found this recipe through Google. It was absolutely delicious.


55 | 366 snow man
Feb 24, 2012 - we finally got the perfect snow to make a snow man, so after 3K was out today Max, Sam and I made a snow man in the front yard and had a blast doing it! He ended up with about 8 arms and we named him the 'alien snowman'.


56 | 366 garage shelving

Feb 25, 2012 - now that he finished with the basement shelving, my wonderful husband has decided to tackle the garage. Have I mentioned how much I love him?